

Animation
There are two kinds of animation. Skeletal animation bends a character’s skinned mesh with the clips that came with its model. Property animation changes an entity’s values over time, such as its position, a light’s colour or a material’s glow, along keys you set in the editor.
Both run only while the game plays or a scene page simulates.
Importing animated models
Section titled “Importing animated models”Import a .glb, .gltf, .fbx or .obj model with Animations on (the default). Its
skeleton becomes a Skeleton asset, and each of its animations becomes an Animation Clip.
The model’s prefab gets a Skeletal Animation component on its root. It plays the clip named
idle in any case, or else the first clip whose name contains “idle”, or else the first clip. A
character placed in a scene therefore plays its idle animation when the game plays.
Double-click a clip to open its page. The page plays the clip on a skeleton you pick on the preview’s bar, with a skinned mesh over it if you pick one. Its settings are the clip’s Looping, its Root motion (below), and its Events: named moments in the clip, each shown as a marker on the time ruler under the preview, which you can drag to move.
Playing one clip
Section titled “Playing one clip”Skeletal Animation plays one clip on a skeleton:
- Skeleton and Clip.
- Speed (1), and Start Time (0), the point in the clip where it starts. Different start times keep a herd of the same animal from moving in step.
- Auto Play (on): the clip starts when the game starts. While it is on, giving the component another clip plays the new clip at once.
- Mesh Entities: the skinned meshes it poses. A character made of several meshes (a body, a head, armour) lists them all here. With the list empty, it poses the mesh on its own entity.
- Root Motion and Root Motion Target, described under Root motion.
Scripts drive it through SceneAnimation:
local Wave = Guid.new("9a1d6c3e-7f2b-4e8a-b5c4-1d2e3f4a5b6c") -- a clip's ID
function Npc:greet()    local animation = SceneAnimation.of(self.entity.scene)    animation:setClip(self.entity, Wave)    animation:play(self.entity)end
Guid kWave = Guid("9a1d6c3e-7f2b-4e8a-b5c4-1d2e3f4a5b6c"); // a clip's ID
void greet(){ SceneAnimation@ animation = SceneAnimation::of(self.scene); animation.setClip(self, kWave); animation.play(self);}SceneAnimation also has stop, pause, resume, isPlaying, time and setTime, each
taking the entity. The component builds its player on its first frame, so calls that reach the
player (play, stop, setTime and the graph parameters below) do nothing before then, for
example in onStart. Make them from onUpdate.
Animation graphs
Section titled “Animation graphs”A character that walks, runs, jumps and falls needs to move between its clips smoothly, and to blend them by speed. An Animation Graph asset does this. Make one in the Assets panel with New > Animation > Animation Graph, and play it with an Animation Graph component in place of Skeletal Animation. Give the component the Skeleton, the Graph and its Mesh Entities. Its Active setting (on) pauses the graph when turned off.
A new graph has a Speed parameter and a Base layer with one state, Idle, which has no clip yet. A graph is made of:
- Parameters: values the game sets, of type
Float,Int,BoolorTrigger. A trigger is a one-off: a transition that uses it clears it. - States: what the character is doing. A state plays one clip, or blends several clips by one parameter or by two. A blend by one parameter places each clip at a value of it (idle at speed 0, walk at 2, run at 6); a blend by two places them on a plane, for moving in any direction. Each state has its own Speed and Loops setting.
- Transitions: arrows from one state to another. A transition is taken when all of its Conditions hold (such as Speed is above 0.1), and the two states blend over its Blend time (0.25 seconds). With Waits to exit on, it waits until the state has played as far as Exits at, from 0 (its start) to 1 (its end). When several transitions could be taken, the lowest Priority goes first. Transitions from Any State can be taken from whatever state the character is in, for a fall or a hit.
- Layers: graphs over graphs. A layer above the base one replaces it (Override) or adds to it (Additive), at a Weight from 0 to 1, so an upper body can wave while the legs walk. Each layer’s Starts in names the state it plays first.
The graph page
Section titled “The graph page”Double-click the graph to open it. The left side lists the layers and the parameters, each with its own add and remove buttons; a parameter is added by choosing its type. The middle shows the chosen layer’s states and transitions, with the preview under them. The right side shows the settings of whatever is selected: a layer, a parameter, a state or a transition.
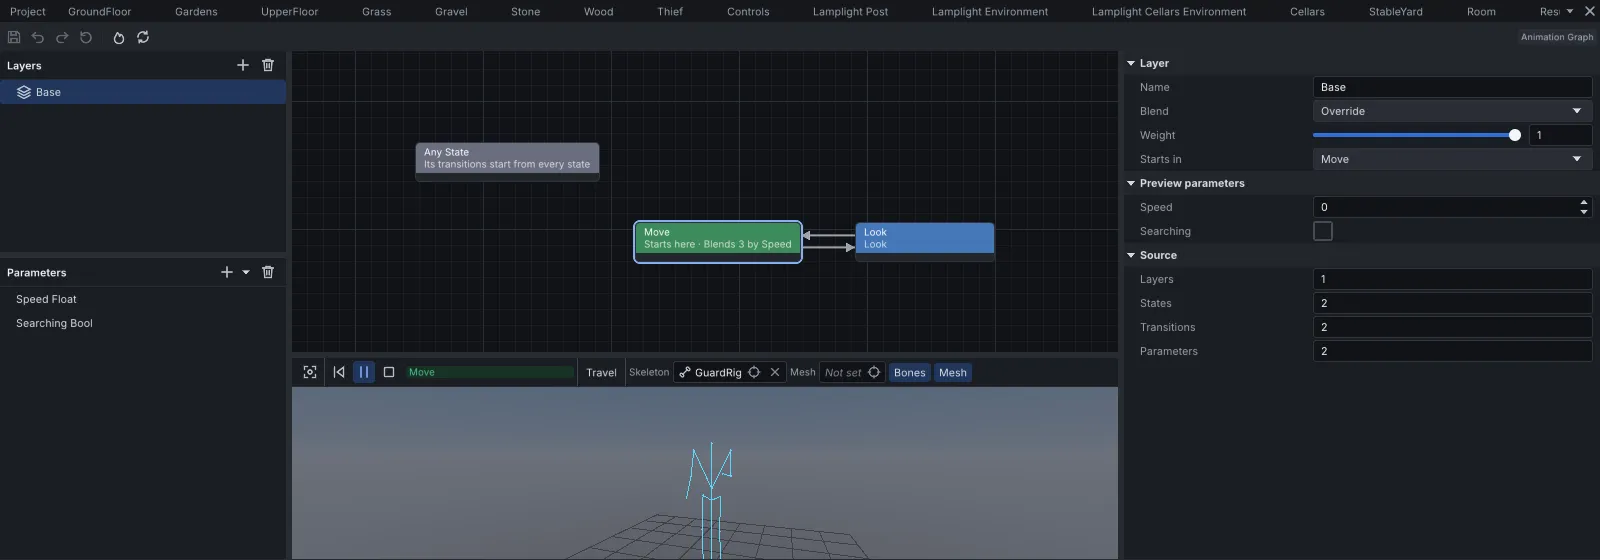
- Right-click the canvas and choose Add node… to add a Clip State, a Blend by One Parameter or a Blend by Two Parameters.
- To add a transition, drag from just outside a state’s edge to another state, or right-click a state, choose Add transition, and click the state it goes to.
- Select a transition to give it conditions. Each condition is a parameter, a comparison (equals, differs from, is above, is below, is at least, is at most) and a value.
- Select a state and press Delete, or use its right-click menu, to delete it with its transitions.
To preview, pick a Skeleton and a Mesh on the preview’s bar and press play. The state playing is lit on the graph and named beside the play button. The settings pane gets a Preview parameters section. Set the parameters there by hand, and tick a trigger’s Fire box (such as Fire Jump) to fire it once. These values belong to the preview and do not change the graph. Travel makes the preview walk by the graph’s root motion instead of playing in place.
Setting parameters from a script
Section titled “Setting parameters from a script”function Player:onUpdate(dt) local animation = SceneAnimation.of(self.entity.scene) local character = CharacterComponent.of(self.entity) local v = character.velocity animation:setFloat(self.entity, "Speed", math.sqrt(v.x * v.x + v.z * v.z)) animation:setBool(self.entity, "Grounded", character:grounded()) if Input.wasPressed("Jump") then animation:setTrigger(self.entity, "Jump") endendvoid onUpdate(double dt){ SceneAnimation@ animation = SceneAnimation::of(self.scene); CharacterComponent@ character = CharacterComponent::of(self); Float3@ v = character.velocity; animation.setFloat(self, "Speed", Math::Sqrt(v.x * v.x + v.z * v.z)); animation.setBool(self, "Grounded", character.grounded()); if (Input::wasPressed("Jump")) { animation.setTrigger(self, "Jump"); }}setInt sets an Int parameter, such as which weapon is drawn. A name the graph does not have
changes nothing. To pause or resume a graph, set active on AnimationGraphComponent.of(entity).
Root motion
Section titled “Root motion”Some clips move the character themselves: a lunge, a vault, a walk whose feet must not slide. With root motion, the clip’s travel moves the entity, and the clip plays in place.
- On the clip’s page, under Root motion, turn on what to take out of the clip: Travel along the ground, Height (its rise and fall), and Turning about the vertical. Root bone names the bone the travel is read from; empty, it is the skeleton’s first root bone. Travel on the preview’s bar walks the preview along the path. Importing a model with Root motion on sets this up for its new clips.
- On the animator (a Skeletal Animation or an Animation Graph component), set Root Motion:
Character: moves the character controller on the entity or the nearest one above it, so it still collides. This is the usual choice. The controller moves along the ground and turns; height travel is not applied to it.Entity: moves and turns the entity named in Root Motion Target, or the animator’s own entity when it is empty.Script: moves nothing. A script readsrootMotionTranslation(entity)androotMotionYaw(entity)fromSceneAnimationand decides what to do with them.Ignore(the default): the travel is dropped.
In a graph, only the base layer gives root motion.
IK (inverse kinematics) bends a limb to reach a point, after the animation has posed it. Add an IK component to the animated entity, or to an entity below it. It works on the nearest animator at or above its entity; when there is none, it uses the one animator below it. The bone fields offer the animator’s bones to choose from.
- Two Bone IK: an arm or a leg, from its Start Bone (a thigh, an upper arm), Mid Bone (the knee or elbow) and End Bone (the foot or hand), reaching for a Target entity: a hand on a door handle. Pole is an optional entity the joint bends toward, and Match Rotation turns the end bone to the target’s rotation as well.
- Aim IK: turns a chain of Bones, such as the spine and head, so the last one points at a
Target. Each bone has a Share of the turn. It turns up to Max Turn to either side
(60 degrees) and Max Tilt up or down (45 degrees). Past those limits it holds at the limit,
or, with Beyond Limits set to
Release, eases off until the target comes back within them. - Foot IK: plants up to four feet on the ground under them, angled to its slope, and lowers the Pelvis Bone so the lower foot can reach.
Each has a Weight (1), from 0 to 1, and fades in and out over Fade Seconds (0.2) when it is turned on and off. Order decides which runs first when several IK components work on one animator, and Debug Draw draws the chain and its target while the scene runs.
When a Two Bone IK or an Aim IK has no target entity, it reaches for the point a script gives with
setIkTarget(entity, worldPosition) on SceneAnimation. ikReached(entity) says whether it got
there, and ikError(entity) how far it is off.
Bone attachments
Section titled “Bone attachments”A Bone Attachment makes its entity follow one Bone of the nearest animator above it while the game plays. Put a sword, a hat or a lantern under an entity with one, and it moves with the hand or the head. Its children keep their own offsets. When a model’s file hangs a mesh under a bone, such as a weapon in a hand, the import puts a Bone Attachment on that bone’s node, so the mesh moves with the animation.
Crowds
Section titled “Crowds”Instanced Skinning animates the instances of an instanced mesh of a skinned model, so a crowd of hundreds costs about as much as a few characters. Put it on the entity with the Instanced Mesh, or list the instanced meshes in Targets (one per part of a character). Set its Skeleton, its Clips (the animations the crowd plays) and its Speed (1).
Each clip is posed at Pose Count points through it (32), and every instance takes one of those poses. More poses give a smoother spread and cost more. Each instance plays one of the clips: an Instance Member chooses it with its Clip, the clip’s place in the list (0 for the first), so a guest can walk, then stop to talk.
The Instanced Mesh’s Pose Assignment decides how instances on the same clip pick their poses:
Hashed(the default) scatters them, so a crowd does not move as one.Unisonkeeps them in step: dancers on a beat, a column marching.Sequentialgoes through the poses in the instances’ order, a wave along the list.Explicittakes each instance’s pose from a list of pose numbers that native code fills. Without that list, it scatters them asHasheddoes.
Property animation
Section titled “Property animation”A Property Animation Clip animates the values of one entity: its position, rotation and
scale, and the decimal numbers, colours, three-part vectors (Float3) and rotations of its
components. Use it for a door that swings, a light that flickers, or a platform that moves along
a route and back.
Making a clip
Section titled “Making a clip”- Open the animation panel with Animation on the scene page’s toolbar, or with Scene > Animation Panel. It sits under the viewport.
- Bind the entity to animate: select it in the scene and press the target button, which animates the selected entity, or pick it from the scene’s entities with the button beside it.
- Press the + button at the start of the panel’s bar to make a new clip, or open one. A new clip asks for its name and where to keep it. If the entity has a Property Animator with no clip, the new clip is given to it.
- Track adds a track for one of the entity’s properties.
- Move the playhead on the ruler, change the entity’s values in the scene or the inspector, and press Key. It keys the chosen tracks, or every track when none is chosen, with the values the entity shows.
- Shape the curves in the curve view under the dopesheet. Drag keys to move them, double-click
a curve to add a key, and right-click a key to set its interpolation (
Constant,LinearorCubic) and its tangent mode (Auto,Smooth,FlatorBroken). - Save the clip with its save button, or Ctrl+S while the panel has the focus.
The play button previews the clip in the scene, and Loop repeats the preview. Length sets the clip’s length in seconds; it is never shorter than the last key. A Property Animator’s inspector also has Edit Clip, which opens its clip in the panel bound to its entity.
Playing a clip
Section titled “Playing a clip”Give the entity a Property Animator with the Clip. Autoplay (on) starts it with the
game; turn it off for a clip that a script starts, such as a door that opens when used.
Speed (1) can be negative to play the clip backwards, and Loop Mode is Once, Loop
(the default) or PingPong (to the end and back).
function Door:open() PropertyAnimatorComponent.of(self.entity):play()endvoid open(){ PropertyAnimatorComponent::of(self).play();}play() starts from the beginning. The component also has pause, resume, stop (which goes
back to the start), isPlaying, time and setTime(seconds).
A clip cannot animate switches or choices, such as a checkbox or a list setting. Do not animate the position of an entity with a dynamic rigid body, because physics moves it; make the body kinematic instead.