

Meshes and materials
Meshes
Section titled “Meshes”A Mesh component draws a mesh asset at its entity. Importing a model makes a prefab named Prefab in the model’s group, with an entity for each node of the model and a Mesh component on each node that has a mesh. Place it with Scene > Entity > Spawn Prefab…. To add a mesh by hand, press Add Component on an entity, choose Mesh, and pick the mesh asset.
- Materials: one material per material slot of the mesh, in the mesh’s order. A mesh with one slot needs one material. A slot left empty, or a part of the mesh with no slot of its own, uses the first slot’s material. Each slot draws with its own material’s shader, so one slot can use a custom shader while the rest use PBR.
- Color: a tint multiplied into the materials’ colour, so one material can make red, green and blue crates.
- Visible: hides the mesh without removing it.
- Fade: fades the mesh out with a fine dither, from 0 (solid) to 1 (gone). Its shadow stays.
- LOD Bias and Force LOD: for meshes with several levels of detail, which are coarser versions of the mesh for far away. A positive bias switches to the coarser levels sooner, and a negative one later. Force LOD pins one level: 0 is the finest, and -1 lets the engine choose.
Materials
Section titled “Materials”A material says how a surface looks. Importing a model makes a material for each of the model’s materials, with its textures. A material authored with Phong or Lambert shading becomes a Phong material, so the model looks as it did in the tool that made it. To make a material yourself, open New > Materials in the Assets panel and choose one of the three built-in kinds:
- PBR Material: lit physically, by how metallic and how rough it is. This is the usual choice.
- Unlit Material: a colour or a texture, unaffected by light. It still casts shadows.
- Phong Material: lit the classic way, with a diffuse colour and a specular highlight as tight as its Shininess (20 at first). It suits models made in older tools, and it casts shadows too.
A material’s Built-in row switches it between the three. Settings that two kinds share by name are kept: the colour and texture always, and between PBR and Phong also the normal map, the emission and the alpha cutoff.
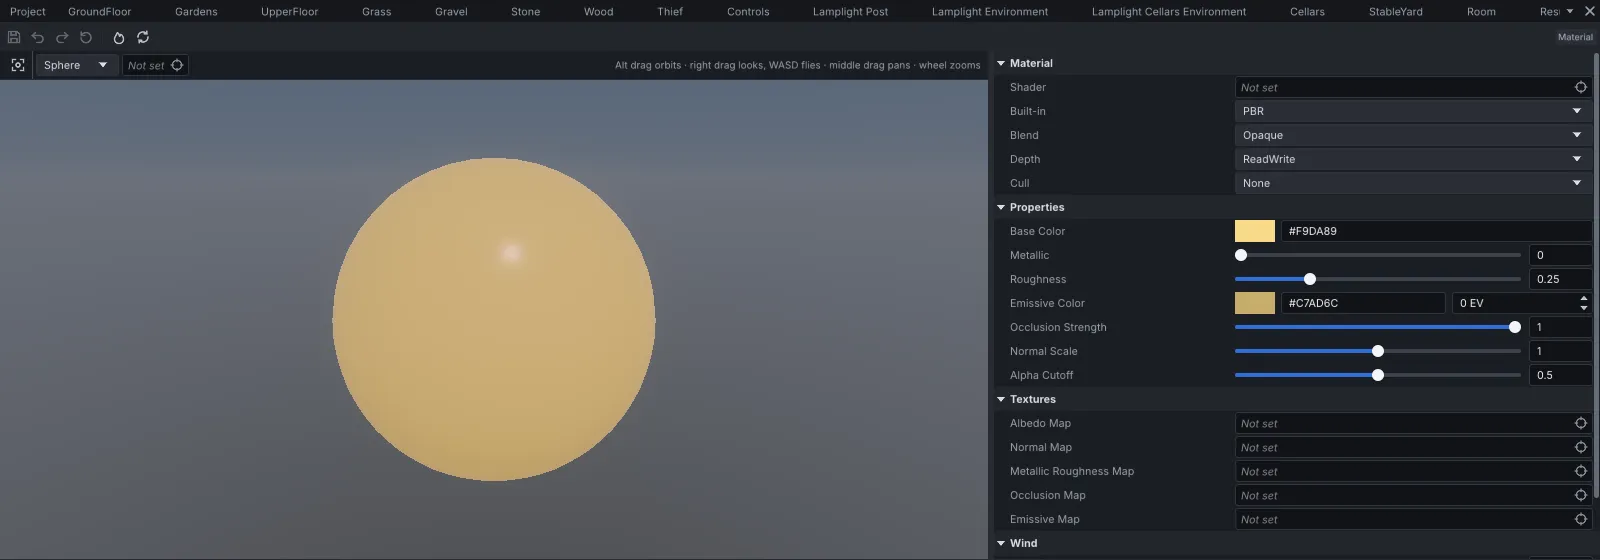
Double-click a material to open its page. The page shows a preview and the material’s settings. The preview can show the material on a Shape (a sphere, cube, plane, cylinder, torus or cone) or on one of your meshes. When you save, every mesh using the material updates.
A PBR material has:
| Setting | |
|---|---|
| Base Color and Albedo Map | Its colour, and a texture multiplied by it. |
| Metallic | 0 for most things, 1 for bare metal. 0 at first. |
| Roughness | 0 is a mirror, 1 is completely matte. 0.5 at first. |
| Metallic Roughness Map | A texture holding both, as glTF stores them: roughness in green, metallic in blue. |
| Normal Map and Normal Scale | Fine bumps and dents, and how strong they look. |
| Occlusion Map and Occlusion Strength | Darkening in creases and corners. |
| Emissive Color and Emissive Map | Light the surface gives off, without being lit. Emissive Color has a colour and an Intensity; an intensity above 1 makes the surface glow and, with bloom, spill light around it. |
| Alpha Cutoff | With Blend set to Masked, the alpha below which the surface is not drawn. 0.5 at first. |
Leaves and grass can sway in the wind. A material’s Wind section, below its other settings, sets the sway:
| Setting | |
|---|---|
| Strength | How far the top of the mesh sways, in metres, from 0 to 2. At 0 (the default) the mesh is still. |
| Speed | How fast it sways, in radians per second. 1 at first. |
| Height | The height, in the mesh’s own units, at which the sway reaches full strength (1 at first). The sway grows with height, and nothing at or below the mesh’s origin moves, so a blade of grass or a card with its root at the origin sways from the ground up. |
The shadow, and picking in the editor, sway with the mesh. Every material whose shader supports
wind has the section: PBR, Phong, Unlit, and custom shaders that
declare it. A script or a per-entity material override names the values Wind.Strength,
Wind.Speed and Wind.Height.
Blending and see-through surfaces
Section titled “Blending and see-through surfaces”Blend says how the surface combines with what is behind it:
Opaque: solid. This is the default, and the fastest.Masked: each point is either solid or not drawn at all, by comparing the alpha of the colour and texture against Alpha Cutoff. Use it for leaves, fences and cut-outs.AlphaBlend: see-through by its alpha, for glass, water and smoke.Additive: adds its light to what is behind it, for fire, glows and beams.MultiplyandPremultipliedAlpha, for effects that need them.
Cull Back (the default) leaves out the back of each face. None draws both sides, for a
leaf or a sheet of paper, and Front leaves out the front. Depth sets how the surface reads
and writes depth; leave it at ReadWrite unless an effect calls for something else.
A glTF model’s see-through materials import as Masked or AlphaBlend, and its double-sided
ones with Cull None.
Instanced meshes
Section titled “Instanced meshes”An Instanced Mesh component draws one mesh many times in a single draw, for scattered rocks, a crowd or a forest. Its instances move with its entity. Its inspector sets the Mesh, the Materials (one per material slot, as for a mesh), a shared Color, Visible, and Pose Assignment for animated instances (see crowds). The instances themselves are not edited there. For trees and grass on a terrain, vegetation places them for you.
An entity can also be one of the instances. Give it an Instance Member component and set its Instanced Mesh to the entity that has the Instanced Mesh component. The entity is then drawn as one of its instances, at the entity’s own position, wherever it goes: moved by navigation, physics, a script or the network, and still in one draw with all the others. This suits pickups, props, units and the people of a crowd.
- Clip: which animation the instance plays when the instances are animated (see crowds).
- Tint: the instance’s own colour, multiplied by the instanced mesh’s Color. Use it to
mark out one guest in a crowd, or, since a custom shader reads it as its input colour, to make
one mask glow. A script sets it through
InstanceMemberComponent.of(entity).tint.
Sprites
Section titled “Sprites”A Sprite draws a flat picture in the world: a tree in the distance, a spark, a sign.
- Texture, its Size in metres, and Uv Rect, the part of the texture to show (for a sheet that holds several pictures).
- Tint, and Additive for a glow that adds light instead of covering what is behind it.
- Orientation:
CameraFacing(the default) always faces the camera.CameraFacingYturns only about the vertical axis, for trees and characters that should stay upright.WorldAlignedlies in the world’s XY plane whatever the entity’s rotation.EntityOrientedlies in the entity’s own plane and turns with it, for a sign on a wall. - Visible: hides the sprite without removing it.
Decals
Section titled “Decals”A Decal projects a texture onto whatever surfaces are inside its box: a footprint, a scorch mark, a painted sign on a wall. It projects along the entity’s local Z axis, so turn the entity to face the surface.
- Size: the box. X and Y are the picture’s size, and Z is how deep the projection reaches.
- Texture and Color.
- Fade Start and Fade End: on a surface turned away from the projection, the decal fades out between these angles, in radians (0 and 1.3 at first), so it does not smear down the sides of things.
- Visible: hides the decal without removing it.
Up to 256 decals are drawn in a frame.
Custom shaders
Section titled “Custom shaders”A material can use a shader you write. See Custom shaders.