

Exporting a game
An export turns a project into a folder that runs on its own: the game’s player, its content and the engine’s shaders, with no editor. Each target (a desktop, the browser, the Steam Deck) is one export preset, and each preset is built from an export template.
Export templates
Section titled “Export templates”A template is a ready-built player for one platform and configuration: the program that runs a game, without any game in it. An export adds your project’s content to a copy of it.
The editor always has one template: its own player, built beside it, for the platform it runs on. So an editor you built from source exports to that platform without anything more. A template for another platform comes from building the engine for it:
| Platform | How to build its template |
|---|---|
| Linux | scripts/build-export-templates.sh linux |
| The browser | scripts/build-export-templates.sh web (needs the Emscripten SDK) |
| Windows | pwsh scripts/build-export-templates.ps1 |
| Steam Deck | scripts/build-steamdeck.sh (see Platforms) |
The scripts install the templates into the editor’s templates folder: templates in the editor’s
user data folder (~/.local/share/assiduousengine/templates on Linux,
%LOCALAPPDATA%\assiduousengine\templates on Windows). Edit > Preferences…, on the Export
tab, can point the editor at another folder.
Edit > Export Templates… (also a button in the Export dialog) lists the installed templates, with their platform, configuration and engine version. From there:
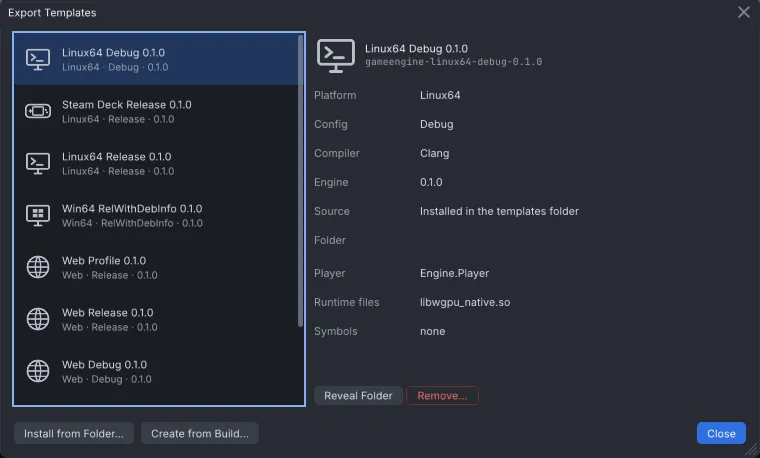
- Install from Folder… copies in a template someone gave you (a folder with a
template.xml). - Create from Build… makes a template from a player you built (a
Bin/<configuration>/<platform>-<compiler>folder). - Remove… deletes one, and Reveal Folder shows where it is.
A template built for another engine version is marked Built for another engine version. An export with it still runs, but the player should match the editor that cooked the content.
Export presets
Section titled “Export presets”Project > Export… opens the Export dialog. On the left are the project’s presets; + adds one for this computer’s platform, and the other two buttons duplicate and remove the selected one. The card at the top says which template the preset will use, or that none is installed for it.
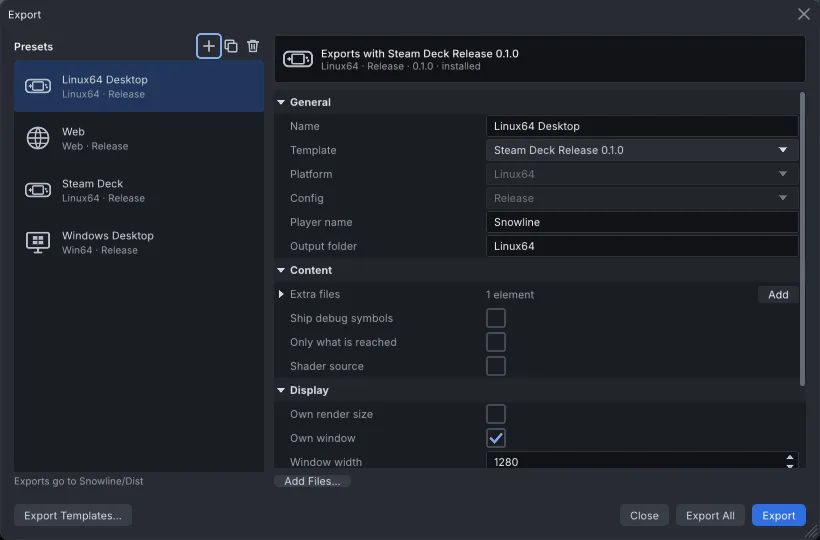
A preset’s settings are in three sections.
General
- Name of the preset.
- Template: Any for its platform and config takes the best one installed for the platform and config below, or pick one by name, which decides both.
- Platform and Config, when the template is Any. They offer this computer’s platform and Release, and the platforms and configurations of the templates installed.
- Player name: the name of the game’s program. Leave it empty for the template’s own
(
Engine.Player). - Output folder: the folder inside
Dist/. Leave it empty to use the preset’s name.
Content
- Extra files: files copied beside the player as they are, such as a licence, a readme or
your
CREDITS.md. Add Files… picks them. - Ship debug symbols: copy the template’s debug symbols into the export, for reading crash reports.
- Only what is reached: pack only what the default scene, the startup script and the other
project settings lead to, instead of every cooked asset. An asset the game loads only by name
from a script needs Always Export (see
Assets and importing). An export with this
on also writes
export-report.txt, the list of what was kept and why, and what was left out. - Shader source: ship the project’s shaders as HLSL beside the cooked ones, for players who want to read or mod them.
Display
The project’s display settings (Project Settings, the Display section) apply to every platform. A preset can set its own instead, for a device that needs them: a handheld’s screen size, fullscreen on a console-like device, a phone held one way.
- Own render size: the Render width, Render height and Render fit (Stretch, Letterbox, Crop or IntegerScale).
- Own window: the Window width and Window height, the Window mode (Windowed, Fullscreen or Borderless) and whether it is Resizable.
- Own orientation: Orientation, Any, Landscape or Portrait.
Each of these settings shows once its box is ticked.
The presets are saved in the project, in export_presets.xml, so they belong in version control.
Exporting
Section titled “Exporting”Export exports the selected preset; Export All exports every one. The editor cooks the project first, then packs and copies the game. When it is done, Open Folder on the notice opens the result.
Exports go to the project’s Dist/ folder, one folder per preset. An export does not empty the
folder first, so a file it no longer writes (a player you renamed, say) stays until you delete it.
What a game folder holds
Section titled “What a game folder holds”For a desktop game:
| File | What it is |
|---|---|
The player (<Player name>, .exe on Windows) |
The game’s program. Run it to play. |
Content.pak |
The project’s cooked content |
player.xml |
The game’s settings: its window, its scenes |
Data/ |
The engine’s shaders |
| Libraries beside the player | What the player needs to run |
| Your extra files | As you listed them |
The window’s title is the project’s name. The engine does not yet give the game’s window an icon of its own.
To share the game, share the whole folder. The player finds its content beside itself, so it runs from wherever the folder is put.
Exporting from the command line
Section titled “Exporting from the command line”Tools.Export, built with the editor, exports without opening it:
Tools.Export path/to/project # the first presetTools.Export path/to/project --preset "Web" # one preset, by nameTools.Export path/to/project --all # every presetTools.Export path/to/project --all --rebuild # cook everything again firstTools.Export path/to/project --out /tmp/builds # somewhere other than Dist/It reads templates from $ENV_TEMPLATES_DIR or the default templates folder, not from the
editor’s preference. Tools.Export --template list lists them.
Next: Platforms, for running a game on each.