

The scene viewport
A scene page shows its scene in the viewport, between the hierarchy and the inspector. This page covers moving around in it, selecting entities and moving them.
Moving the camera
Section titled “Moving the camera”| Input | What it does |
|---|---|
| Right mouse button, held | Look around |
| W, A, S, D (right button held) | Fly forward, left, back and right |
| Q, E (right button held) | Fly down and up |
| Left Shift (while flying) | Fly faster |
| Alt + left drag | Orbit around the point the camera looks at |
| Middle drag | Pan |
| Mouse wheel | Zoom toward the point the camera looks at, never past it |
| F | Frame the selection |
| Numpad 5 or O | Switch between perspective and orthographic |
| Tab | Capture the mouse for flying without holding a button; Tab again or Escape releases it |
The W, A, S, D, Q and E keys fly the camera only while the right button is held (or the mouse is captured with Tab). Otherwise Q, W, E and R choose the gizmo’s mode, as below.
F frames the selected entities and everything under them, gliding the camera to them. Double-clicking an entity in the hierarchy does the same for that entity.
The axis tripod in the top right corner of the viewport shows the camera’s orientation. Click one of its axes to look along it: the top and bottom views look straight down and up.
After you zoom with the wheel, the bottom left corner shows for a moment the distance to the point you zoom toward, the size of a grid cell and a scale bar.
Each scene remembers its camera, so a scene opens where you left it.
The view’s chips
Section titled “The view’s chips”Three chips in the top left corner of the viewport set what the view shows. A chip is drawn in the accent colour while its setting differs from the default.
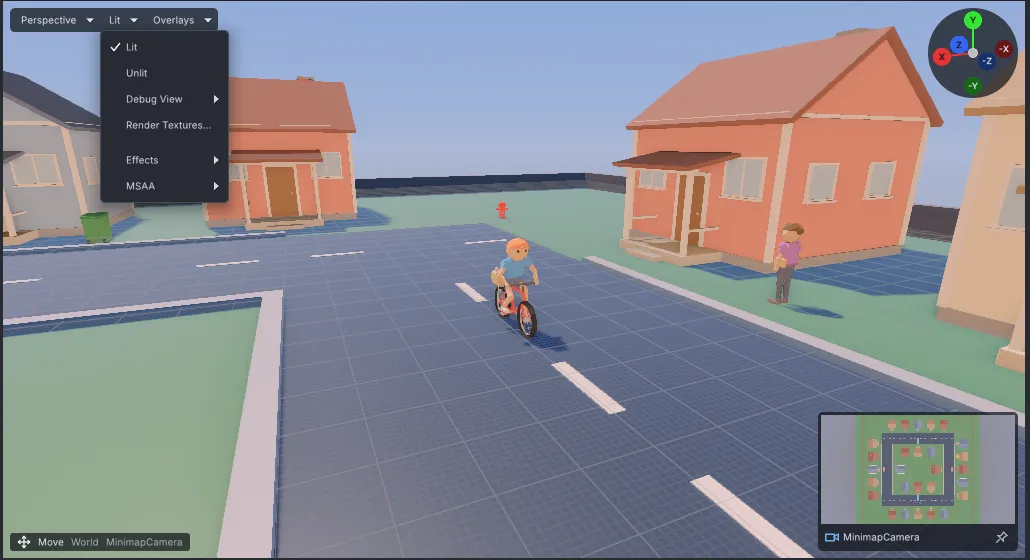
- Projection (it reads Perspective or Orthographic): switch between the two, or look along an axis: Top, Bottom, Front, Back, Right or Left.
- Shading (it reads Lit by default): Lit, Unlit, a Debug View that shows one part of the image (Normals, Roughness, Metallic, Shadow Cascades, Light Clusters or Overbright), and Render Textures…, which shows one of the textures the renderer drew this frame. Its Effects submenu turns post-processing, bloom, ambient occlusion, reflections, global illumination, antialiasing and frustum culling off for this view only, to see what each one adds; its MSAA submenu sets this view’s antialiasing. The shading and effects are not saved.
- Overlays: the Grid (on by default) and its plane (XZ (ground) by default, or XY or YZ), Entity Markers (off by default; the selected entities always show their own), Colliders, LOD Tint and Stats, the frame rate and frame time in the top right corner. The scene remembers these.
Orthographic views
Section titled “Orthographic views”An orthographic view draws without perspective: everything keeps its size however far away it is, and parallel lines stay parallel. It suits lining things up on a plan, a front or a side.
Switch with Numpad 5 or O, the centre of the axis tripod, the projection chip, or Scene > Orthographic. Switching keeps what is in view, and the camera moves, zooms, pans, orbits and frames the same way in both.
Clicking an axis on the tripod also turns the view orthographic, and looking or orbiting away turns it back to perspective. A view you switch by hand stays as it is. To keep axis views in perspective, clear Axis views are orthographic in Edit > Preferences…, on the Appearance tab.
An orthographic view also shows what lies a little behind the camera, as far back as the view is tall, so a view tipped down shows the ground below it; anything further behind is left out.
The scene remembers which view it was in, with its camera.
Selecting
Section titled “Selecting”- Click an entity in the viewport to select it. An entity can also be clicked at its origin, so lights, cameras and empty entities can be picked too.
- Ctrl+click adds an entity to the selection, or removes it.
- Drag from empty space to draw a rectangle: everything inside it is selected when you release. Ctrl+drag adds what is inside to the selection.
- Click empty space to clear the selection.
In the hierarchy, click a row to select its entity, and use Ctrl+click and Shift+click to select several. The arrow keys move through the rows.
The gizmo
Section titled “The gizmo”The gizmo moves, turns and scales the selected entity. When several are selected, it works on the first one you selected.
| Key | What it does |
|---|---|
| Q | Select: no gizmo, so a click picks and a drag draws a rectangle |
| W | Move |
| E | Rotate |
| R | Scale |
| X | Switch between world and local space |
| Ctrl (while dragging) | Snap |
| V (while dragging) | Snap to a vertex |
The same modes are on the scene page’s toolbar and in Scene > Gizmo. A new scene page starts in Move, in world space. Scale always works in the entity’s local space.
Snapping steps the drag by 1 unit when moving, 15 degrees when rotating and 0.25 when scaling. The steps count from where the drag started, not from a world grid. The arrow beside the toolbar’s Snap button picks other steps for each mode, and Snap itself turns snapping on for every drag, without holding Ctrl. Likewise, Vertex Snap on the toolbar puts the selection’s pivot on the vertex under the cursor for every move, without holding V.
Each drag is one step to undo (Ctrl+Z).
The toolbar
Section titled “The toolbar”From left to right, the scene page’s toolbar holds:
- Save, Undo, Redo and Discard Changes.
- Select, Move, Rotate and Scale, and Frame Selection.
- The space switch, whose icon shows World or Local space, then Snap and Vertex Snap.
- Simulate, Pause and Stop, which run the scene in place. While it simulates, the scene cannot be edited, and Stop puts it back as it was. Simulating is not playing the game: Game > Play runs the game in the Game tab.
- The viewport tools for terrain (Sculpt, Paint Layers, Cut Holes), vegetation (Paint Vegetation, Paint Props) and splines (Edit Spline). A tool is available when the scene or the selection has something for it to work on; Esc returns to Select.
- Animation, which opens the property animation panel under the viewport.
Editing entities
Section titled “Editing entities”| Key | What it does |
|---|---|
| Ctrl+D | Duplicate the selected entity |
| Delete | Delete the selected entity |
| F2 | Rename the entity in the hierarchy |
| Ctrl+Z | Undo |
| Ctrl+Shift+Z or Ctrl+Y | Redo |
| Ctrl+S | Save |
| Ctrl+Shift+P | Open the command palette, to find any command by name |
| F12 | Save a screenshot of the editor window |
Duplicate and Delete act on the first selected entity and everything under it. Create Entity, Create Child, Copy, Paste, Paste as Child, Create Prefab from Selection and the Spawn Prefab commands are in the Scene > Entity menu and on the hierarchy’s right-click menu.
In the hierarchy, drag an entity onto another to make it a child; it keeps its place in the world. Drop it on the edge between two rows to reorder it.
To hide an entity, clear Active at the top of its inspector. An inactive entity, and everything under it, neither shows nor runs.
Every shortcut can be changed in Edit > Preferences…, on the Shortcuts tab.