

Terrain and vegetation
Terrain
Section titled “Terrain”A terrain is open ground: hills, valleys and fields. It is made of three assets:
- a Heightfield, the shape: a grid of heights;
- a Splatmap, which records where each ground texture is painted (the terrain page calls it the terrain’s Splat weights);
- a Terrain, which ties the two together with the textures and sets how it looks.
Making a terrain
Section titled “Making a terrain”- New > Terrain > Heightfield. A new one is flat. Set its Grid Size (64k+1), the points
on a side, which must be a multiple of 64 plus one (257 at first); its World Size (XZ),
256 by 256 m at first; and its Min Height and Max Height, the range its heights span
(0 to 64 m at first). You can instead import a 16-bit
.pngor.r16height image made in a terrain tool or taken from a map. - New > Terrain > Terrain. Open it and set its Heightfield. Then choose a size from the New Splat Weights button in the page’s toolbar (512, 1024 or 2048 texels a side) to make its splatmap.
- Under Base layer, set the textures of the ground everywhere: Albedo (colour), Normal, ORM (occlusion, roughness and metalness in one) and Height. Tile is how many metres the textures repeat over.
- Under Paint layers, add the textures you will paint over the base: grass, rock, sand or snow. Each layer has the same textures and Tile, and a Coverage mask that limits where it may show.
- Add an entity with Add Component > Terrain and set its Terrain.
The terrain is centred on its entity. On the component, Lod Bias trades detail for speed: a value above 0 makes the terrain coarser sooner, and below 0 keeps detail farther out. Cast Shadows and Visible can be turned off.
Shaping and painting
Section titled “Shaping and painting”With the terrain in the scene, the scene page’s toolbar has a button of Terrain tools that work in the viewport. Each tool has a brush with a Radius in the tool’s panel, and Shift+wheel changes the radius as you paint.
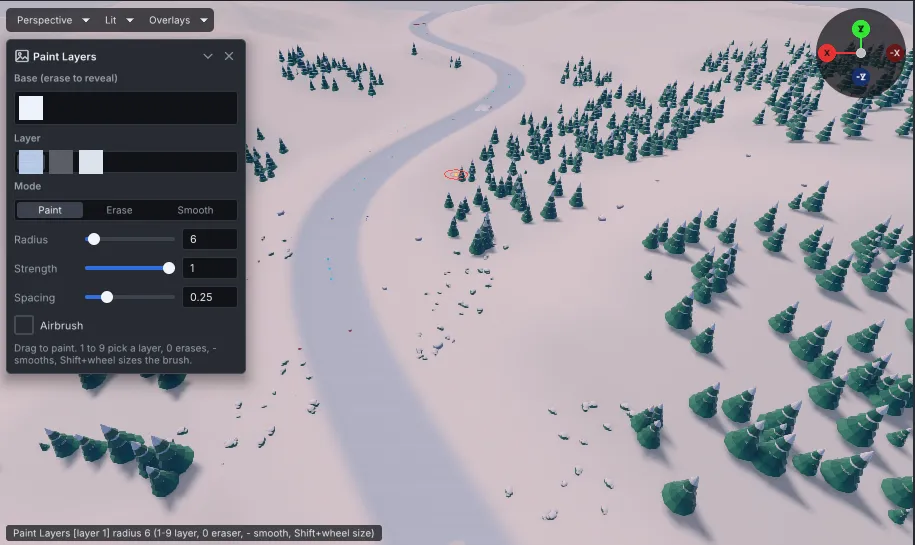
- Sculpt:
Raise,Lower,SmoothandFlatten(keys 1 to 4), with a Strength. Ctrl+click picks the height thatFlattenpulls toward. - Paint Layers: paints a paint layer (keys 1 to 9) over the base. 0 erases back to the base, and - smooths the seams. Strength, Spacing and Airbrush change the stroke.
- Cut Holes: cuts the surface away, for a cave mouth or a tunnel. Nothing draws, collides, walks or grows in a hole. Key 1 cuts and key 2 fills a hole again.
Each stroke is one undo step. Saving writes the sculpted heights back into the heightfield and the painted layers into the splatmap.
Walking on it
Section titled “Walking on it”Terrain is not solid by itself. Give its entity a Rigid Body with Shape Heightfield and
the same Heightfield, as Physics describes. Navigation needs
no collider, because its bake reads the terrain directly.
Vegetation
Section titled “Vegetation”Grass, flowers, bushes, trees and rocks can be drawn in their thousands. Add Add Component > Terrain Vegetation to the terrain’s entity. It holds two kinds of layer, Procedural Layers and Prop Layers, and each layer draws one mesh with its materials. To make grass or leaves sway, give their material wind by setting its Wind section’s Strength above 0 (see Meshes and materials).
Procedural layers
Section titled “Procedural layers”A procedural layer grows its mesh across the terrain at a Density, in instances per square metre. Nothing is stored for each plant, so a field of grass takes no memory to keep. Placement says where it grows:
Uniform: everywhere.Splat: where one of the terrain’s paint layers is painted, above Splat Threshold (0 to 1). Splat Layer picks the layer, counting from 0 for the first paint layer. This puts grass where the grass texture is.Mask(the default): where you paint its plane of a vegetation mask.Splat Times Mask: where both are true.
For Mask, make a mask with New > Terrain > Vegetation Mask, set it as the component’s
Mask, and paint it with the Paint Vegetation tool from the toolbar’s Vegetation tools.
Mask Plane says which of the mask’s planes the layer follows, and keys 1 to 9 pick the plane
you paint (0 erases, - smooths). A new layer grows nothing until its plane is painted.
Prop layers
Section titled “Prop layers”A prop layer holds instances you place by hand with the Paint Props tool: a handful of boulders, or the trees along a path. Keys 1 to 9 pick the layer and 0 erases. Density (props per square metre) and Prop Spacing (in multiples of the mesh’s radius) set how close together they land.
Settings of every layer
Section titled “Settings of every layer”- Scale Range: each instance is scaled at random between two values (0.8 to 1.2 at first).
- Max Slope: no instances on ground steeper than this, in degrees (35 at first).
- Height Range: only between these heights, measured on the terrain.
- Align To Normal: lean with the ground, instead of standing upright.
- Fade Start and Fade End (40 and 80 m): instances thin out with distance between these, and none are drawn beyond Fade End.
- Cast Shadows: off at first, since shadows of many plants are costly.
- Max Per Chunk: the most instances one terrain chunk holds (4096 at first).
- Collision Radius and Collision Height: above 0, each instance is solid, an upright capsule of that size, like a tree trunk. Both scale with the instance. Collision Group sets its physics group. Leave the radius at 0 for grass.